
Small Living Room Layout Ideas for a Stylish Space
A small living room can feel spacious and stylish with the right layout. This article presents eight small living room layout ideas to maximise your space. Discover how multi-functional furniture, floating arrangements, vertical optimisation, diagonal placement, mirrors, zoned micro-layouts, built-in solutions, and symmetrical balance can transform your compact NZ living room. These ideas will help you create a functional and beautiful space, regardless of size.
1. Multi-Functional Furniture Layout
Maximising space is a top priority when it comes to small living room layout ideas, and multi-functional furniture is a key strategy for achieving this. This approach centres around incorporating furniture pieces that serve more than one purpose, allowing you to adapt your living room to different needs throughout the day without sacrificing comfort or style. Imagine a stylish sofa that transforms into a bed for guests, or a coffee table that expands to accommodate a dinner party – this is the essence of multi-functional furniture. By carefully selecting convertible or dual-purpose items like sofa beds, storage ottomans, nesting tables, and expandable dining solutions, you can create a dynamic and versatile living space perfectly suited for compact NZ homes.
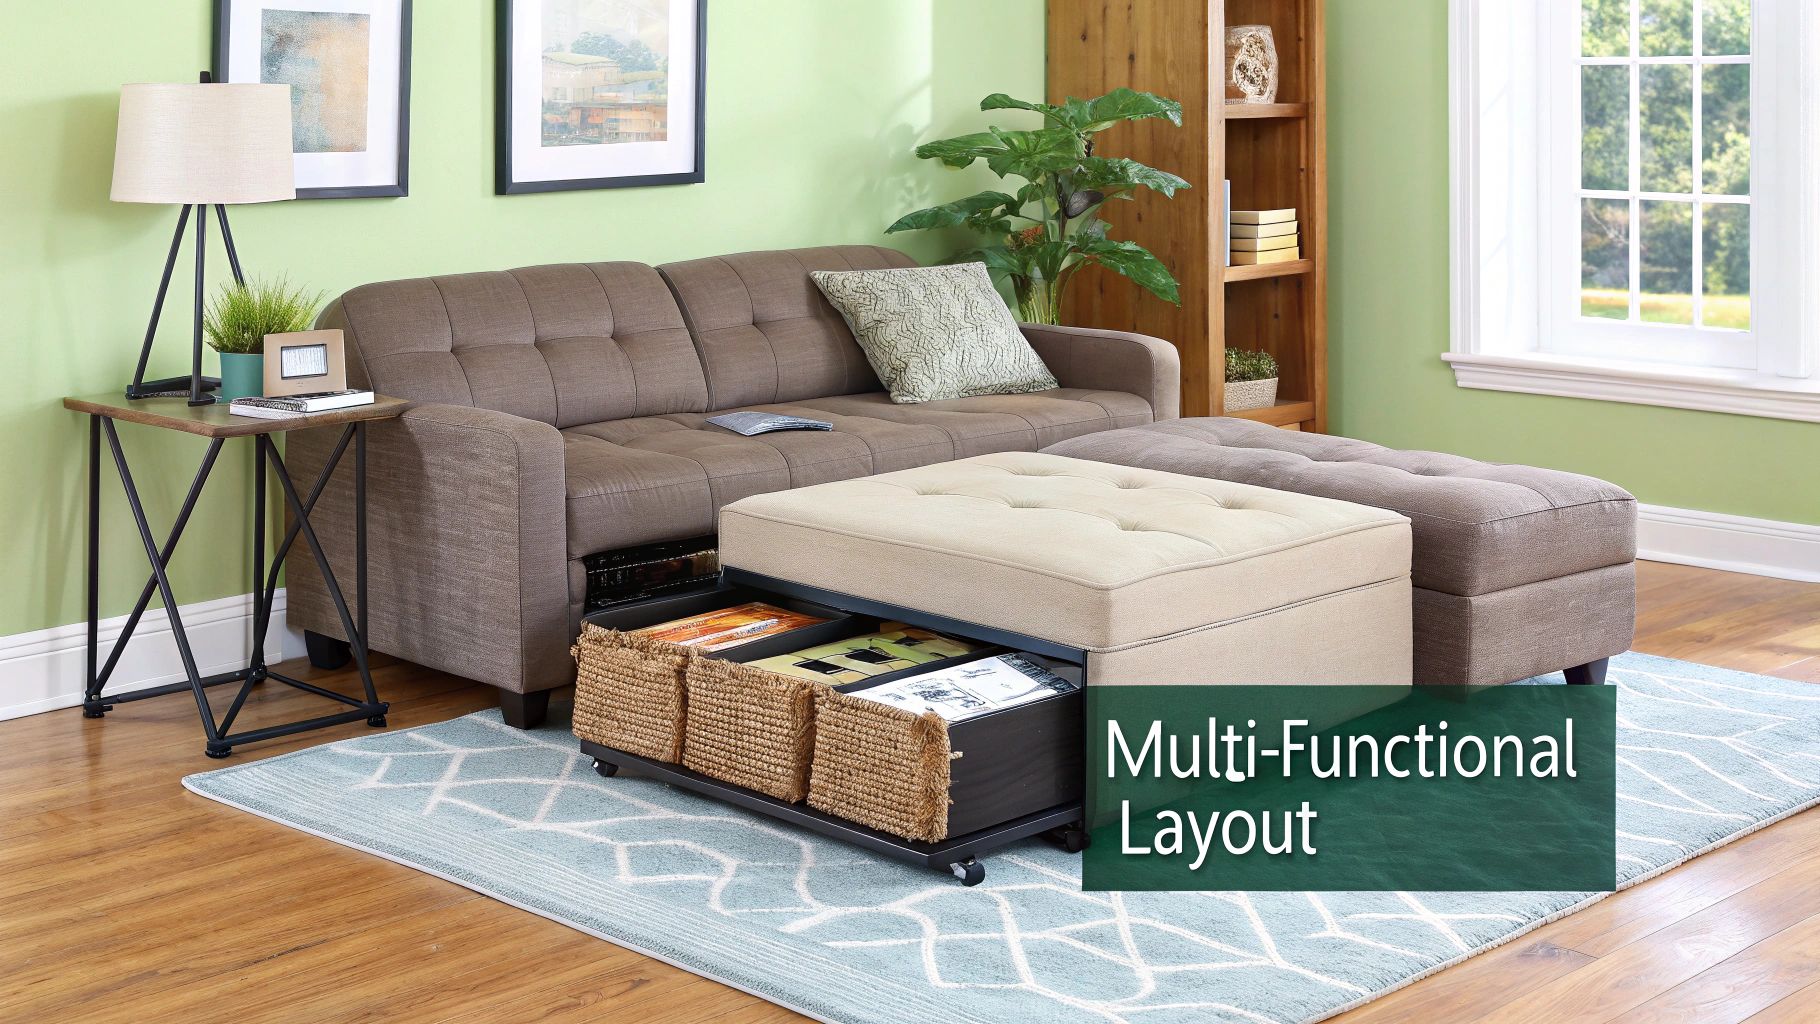
This method is particularly valuable in smaller New Zealand homes where space is at a premium. Features like hidden storage compartments within ottomans or sofa beds help keep clutter at bay, while modular and lightweight furniture allows for easy reconfiguration. This layout truly shines when you need flexibility. Transitioning from a relaxed lounge area to a home office or a dining space becomes seamless with the right furniture choices.
Examples of successful implementation:
- West Elm's Urban sofa bed: A stylish sofa that effortlessly converts into a full-size bed, perfect for accommodating overnight guests.
- IKEA's FRIHETEN sofa-bed: A budget-friendly option with integrated storage, ideal for smaller living rooms.
- Resource Furniture's transformable coffee tables: These innovative tables expand to become dining tables, maximising functionality in limited spaces.
- CB2's Go-Cart rolling desk: A versatile piece that serves as a console table or a mobile workspace.
Tips for incorporating multi-functional furniture:
- Prioritise quality: Invest in pieces with durable transformation mechanisms to ensure longevity.
- Neutral colours: Opt for neutral colours for larger pieces to maintain design flexibility and create a cohesive look.
- Built-in storage: Maximise storage potential by choosing furniture with integrated compartments.
- Ease of transformation: Consider how easily the furniture converts from one function to another for practical everyday use.
- Plan ahead: Map out the different configurations of your living room before purchasing furniture to ensure a smooth flow and optimal functionality.
Pros and Cons:
Pros:
- Maximises usable space and minimises clutter.
- Adapts to various activities and needs.
- Reduces the need for multiple single-purpose furniture items.
- Creates more floor space when items are in their compact form.
- Can be more cost-effective than buying numerous separate pieces.
Cons:
- Can be more expensive initially compared to single-purpose furniture.
- Some convertible pieces may not be as comfortable as dedicated items.
- Transformation mechanisms may wear out over time.
- Style options can sometimes be more limited.
- May require more effort to reconfigure.
This multi-functional furniture layout deserves its place in the list of small living room layout ideas because it offers a practical and stylish solution for maximising space and functionality. It's an excellent approach for anyone looking to create a versatile and adaptable living area, particularly in smaller NZ homes. Companies like Resource Furniture have pioneered transformable furniture, while IKEA offers budget-friendly multi-functional designs. The Small Space Society provides excellent design consultancy for compact living, and organisational expert Marie Kondo promotes multi-functional living as a key element of a tidy and efficient home.
2. Floating Furniture Arrangement
For small living rooms in NZ homes, where space is often at a premium, the floating furniture arrangement can be a game-changer. This layout pulls furniture away from the walls, creating a more intentional and conversational space. Rather than pushing everything against the perimeter, which can emphasise the room's limited size, this approach establishes a distinct living area, often anchored by a rug. This creates a sense of deliberate design and spaciousness, making the room feel larger than it actually is.
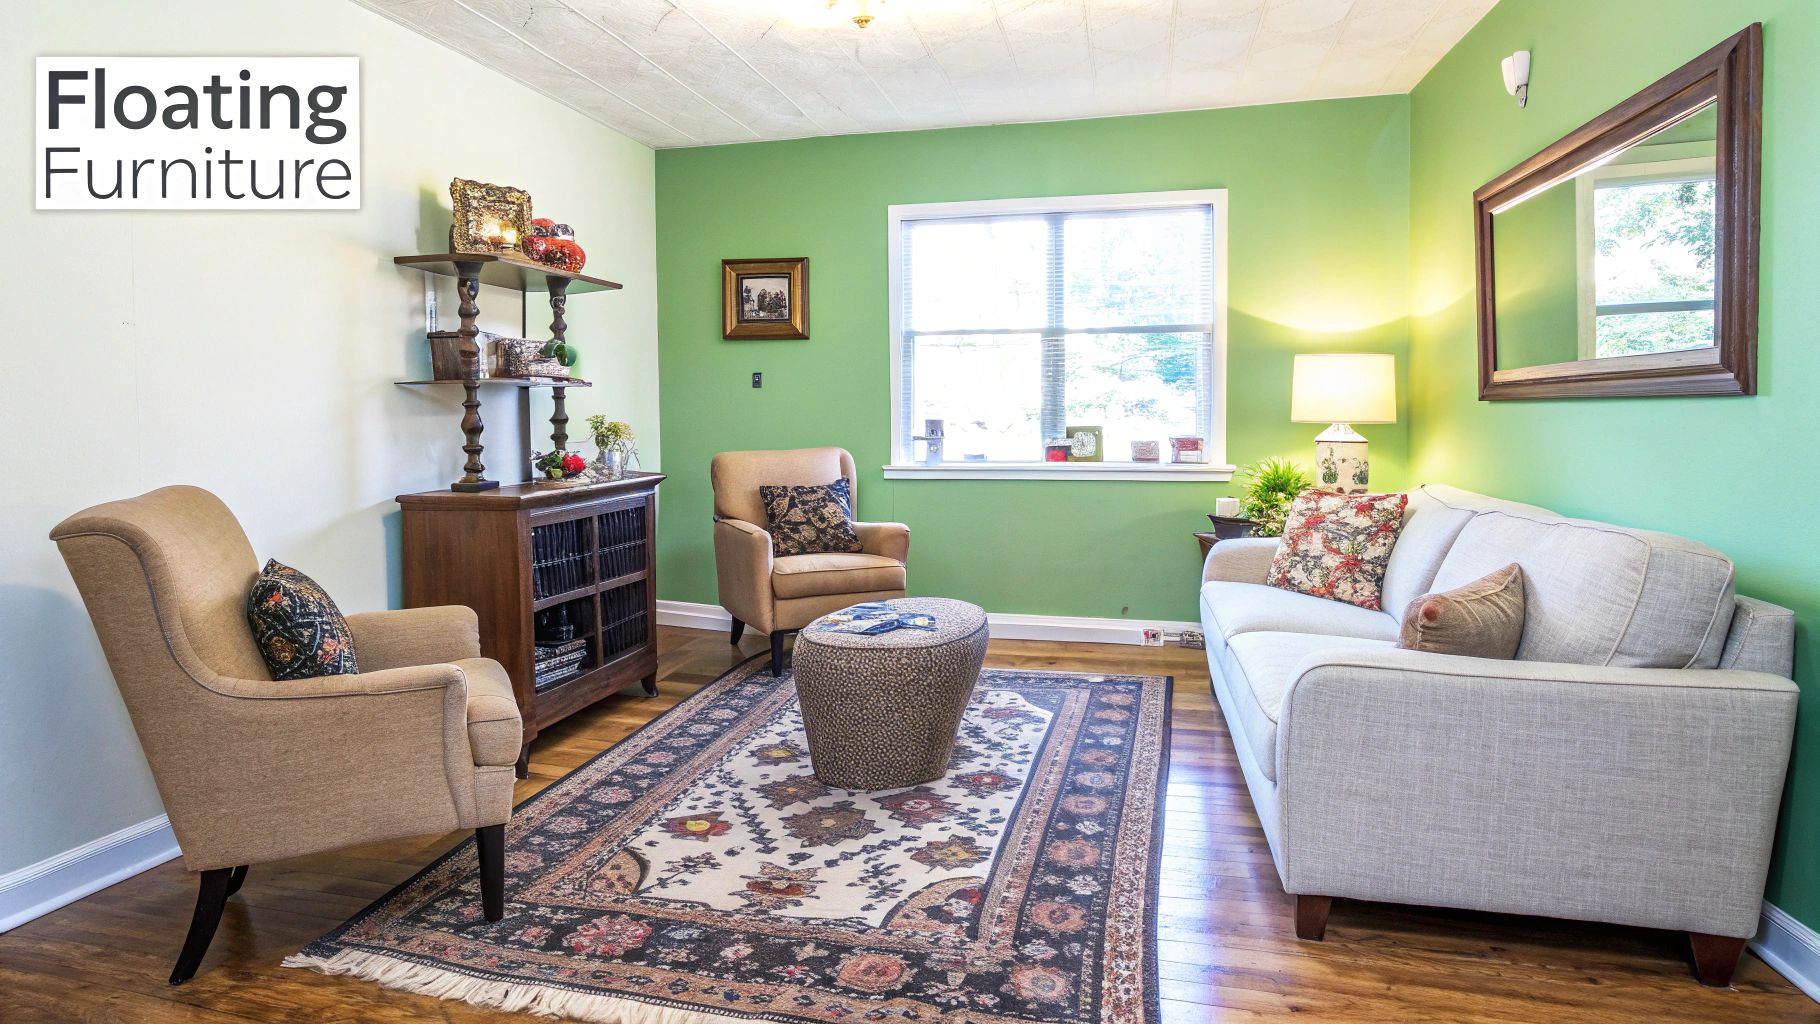
The floating furniture layout relies on a central conversation area, defined by the strategic placement of furniture and an area rug. This creates visual separation from other functional areas in the home, like dining or entryways, particularly important in open-plan Kiwi homes. Features include clearly defined pathways around the furniture groupings, contributing to improved traffic flow. Think of designers like Shea McGee, known for her compact yet stylish designs, often incorporating floating furniture in her projects, including the Netflix show home. Emily Henderson and Studio McGee also frequently showcase this technique in their small living room designs, even in spaces under 200 sq ft, proving its effectiveness in even the most compact NZ homes.
This approach deserves a place on this list because it directly addresses the challenges of small living room layout, offering a solution that enhances both functionality and aesthetics. The benefits are numerous: a more intimate conversation area, improved traffic flow around the room's perimeter, and a greater sense of spaciousness. The visual focal point created by the central furniture grouping allows for more flexible furniture arrangement and intentional design.
However, it's crucial to consider the potential drawbacks. Floating furniture reduces usable square footage against the walls, which might be needed for other functions. In extremely small rooms, this layout could make furniture placement feel crowded if proportions and scale aren't carefully considered. It might also limit TV viewing angles if not planned meticulously.
Tips for Implementing a Floating Furniture Arrangement:
- Rug Size Matters: Use a rug large enough to accommodate at least the front legs of all seating furniture. This anchors the space and contributes to the feeling of a defined area.
- Allow for Movement: Maintain at least 18 inches of walking space around the furniture grouping for comfortable navigation.
- Consider a Round Coffee Table: Round coffee tables improve flow in tighter spaces and soften the look of the arrangement.
- Choose Airy Furniture: Opt for slimmer furniture profiles with visible legs to create a sense of airiness and prevent the space from feeling visually heavy.
- Strategic Positioning: Position the main seating piece (usually a sofa) to face the room's focal point, such as a fireplace or a large window, or towards the entryway to create a welcoming feel.
Popularised by interior designers like Thomas Pheasant and featured in shows like HGTV's Small Space, Big Style and the work of designer Sarah Richardson, as well as online resources like Apartment Therapy, the floating furniture arrangement offers a stylish and practical solution for maximising space and style in small New Zealand living rooms. This approach allows homeowners and renters alike to achieve a designer look while optimising functionality in compact spaces.
3. Vertical Space Optimisation
Living in a smaller home, especially common in NZ cities, often means getting creative with space. Vertical space optimisation is a clever small living room layout idea that capitalises on often-underutilised wall space, drawing the eye upwards and creating the illusion of a larger, more airy room. This method maximises storage and functionality without sacrificing precious floor area, which is crucial in a small living room. It works by incorporating tall furniture, wall-mounted elements, and vertical design features to free up valuable floor space.
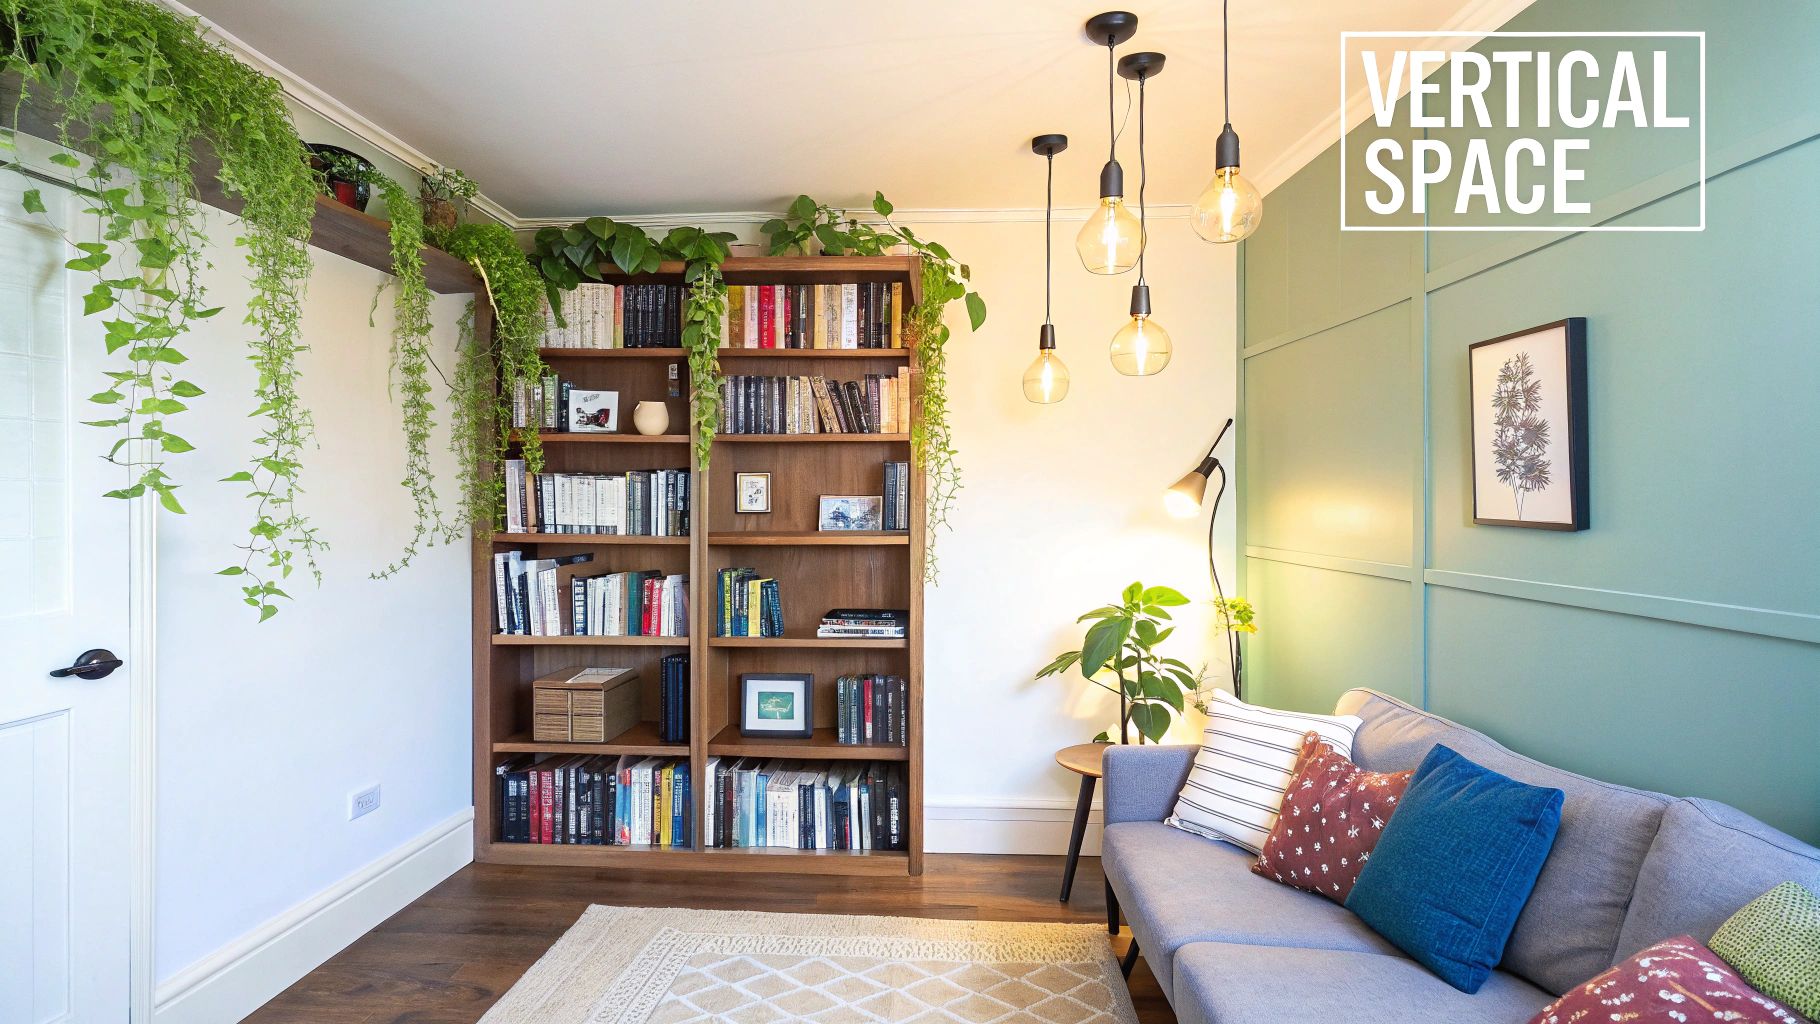
Think floor-to-ceiling shelving or cabinetry, wall-mounted lighting instead of floor lamps, hanging plants, and high curtains mounted close to the ceiling. Even vertical paneling or wallpaper with vertical stripes can subtly draw the eye upwards, enhancing the feeling of height. This approach is particularly effective in rooms with limited square footage but standard ceiling height, a common characteristic of many NZ homes.
Examples of this small living room layout idea in action include popular IKEA BILLY bookcase hacks that extend them to the ceiling, maximising storage capacity. The influence of Scandinavian design is also apparent, with many apartments in that region featuring wall-mounted storage systems like the iconic String shelving. Even in densely populated cities like New York, micro-apartments utilise custom floor-to-ceiling storage walls to optimise every inch. And, of course, Pinterest is full of inspiration, showcasing living rooms with statement gallery walls that extend vertically, adding personality and a sense of spaciousness.
Tips for Implementing Vertical Space Optimisation:
- Camouflage Storage: Paint tall storage units the same color as your walls to help them blend in seamlessly, minimising their visual impact.
- Layered Lighting: Install lighting inside or beneath wall cabinets to create depth and prevent a heavy, closed-in feeling.
- High and Wide Curtains: Hang curtains at ceiling height and extend the rods beyond the window frames to create the illusion of larger windows and higher ceilings.
- Strategic Shelving: Use upper shelves for decorative or seasonal items, keeping daily-use items within easy reach on lower levels.
- Mirror, Mirror: Incorporate mirrors strategically high on walls to reflect light and further enhance the sense of height and space.
Pros:
- Maximises storage without consuming floor space
- Creates the illusion of higher ceilings and a larger room
- Keeps essential items accessible while reducing clutter
- Provides display space for decor without crowding surfaces
- Works well in rooms with limited square footage
Cons:
- Can require professional installation for secure wall mounting
- Upper storage may be less accessible without a step stool
- May feel visually overwhelming if not balanced with open space
- More difficult to change or rearrange than freestanding furniture
- Can make a room feel narrow if vertical elements are too dominant
This small living room layout idea deserves its place on this list because it offers a practical and stylish solution for maximising space in smaller NZ homes. The focus on verticality, championed by designers like Maxwell Ryan of Apartment Therapy, IKEA's small space solutions department, and interior designer Sarah Sherman Samuel, reflects the growing trend of minimalist and functional living, particularly relevant in the context of smaller living spaces. By incorporating these tips and drawing inspiration from the examples provided, you can transform your small living room into a stylish and functional space that feels much larger than its actual footprint. This concept, rooted in Japanese minimalist design philosophy, resonates with the Kiwi desire for practical and stylish living.
4. Diagonal Furniture Placement
Diagonal furniture placement is a clever small living room layout idea that breaks the mould of traditional parallel arrangements. Instead of positioning furniture flush against the walls, this technique involves angling key pieces, often at a 45-degree angle. This seemingly simple shift can dramatically transform a small living room, adding visual interest and creating the illusion of more space by disrupting the boxy feel. The angled arrangement creates dynamic triangular spaces behind furniture that can be used functionally for storage or decoratively with plants or artwork, contributing to a more engaging and spacious feel.
This layout shines in small New Zealand homes where maximising space and creating a sense of openness is paramount. By breaking up straight lines and utilising corners in unconventional ways, diagonal placement can make narrow rooms feel wider and encourage a more natural flow for conversation and interaction. Features like corner-oriented focal points and the asymmetrical balance it creates give the room a unique and considered feel, pushing beyond predictable design conventions.
Examples of Diagonal Furniture Placement Done Right:
- Designer Leanne Ford's Pittsburgh home demonstrates the power of a diagonally placed sofa to create a relaxed, bohemian vibe.
- Emily Henderson has showcased diagonal layouts in HGTV Magazine, demonstrating its effectiveness in small living rooms.
- Dwell magazine often features small apartments utilising this technique to define zones and maximise space.
Tips for Implementing Diagonal Furniture Placement:
- Start with the Sofa: Angle your largest piece of furniture, usually the sofa, to establish the layout's foundation.
- Anchor with Rugs: Use an area rug positioned at the same angle as the sofa to reinforce the diagonal arrangement and visually ground the space.
- Utilise Triangular Spaces: The negative space created behind angled furniture can be cleverly used. Place a plant, floor lamp, or small shelf in these areas to enhance functionality and visual appeal.
- Consider Traffic Flow: Careful planning is crucial. Ensure there's enough space to move easily around the furniture and that pathways aren't obstructed.
- Balance with Straight Lines: Avoid visual chaos by balancing the diagonal elements with some furniture placed traditionally against the wall. This creates a sense of stability within the dynamic layout.
Pros:
- Creates the illusion of a larger, less boxy space.
- Improves conversation flow and interaction by orienting furniture towards each other.
- Generates usable nooks and corners for storage or décor.
- Provides an interesting and unconventional visual perspective.
- Can make narrow rooms feel wider.
Cons:
- Can reduce usable square footage in very small spaces if not carefully planned.
- Awkward triangular spaces behind furniture can be dust traps.
- Might interfere with traffic flow if not strategically implemented.
- Can make TV viewing challenging from certain angles.
- More difficult to arrange in perfectly square rooms.
Who Popularised This Technique?
The impact of designers like Vicente Wolf and Kelly Wearstler, with their embrace of asymmetry, can be seen in the rise of this trend. HGTV’s Room by Room series also helped to bring it into mainstream consciousness. Interestingly, traditional feng shui principles, which often advocate against furniture directly facing doors, have also influenced this approach, suggesting it contributes to a more balanced and harmonious living space.
Diagonal furniture placement deserves its spot on this list of small living room layout ideas because it's a surprisingly effective way to enhance both the functionality and aesthetic appeal of a compact space. By embracing angles and thinking outside the box, you can achieve a living room that feels larger, more dynamic, and distinctly stylish. This method allows Kiwi homeowners to create unique and personalised spaces that reflect their individual tastes while maximising the potential of their small living rooms.
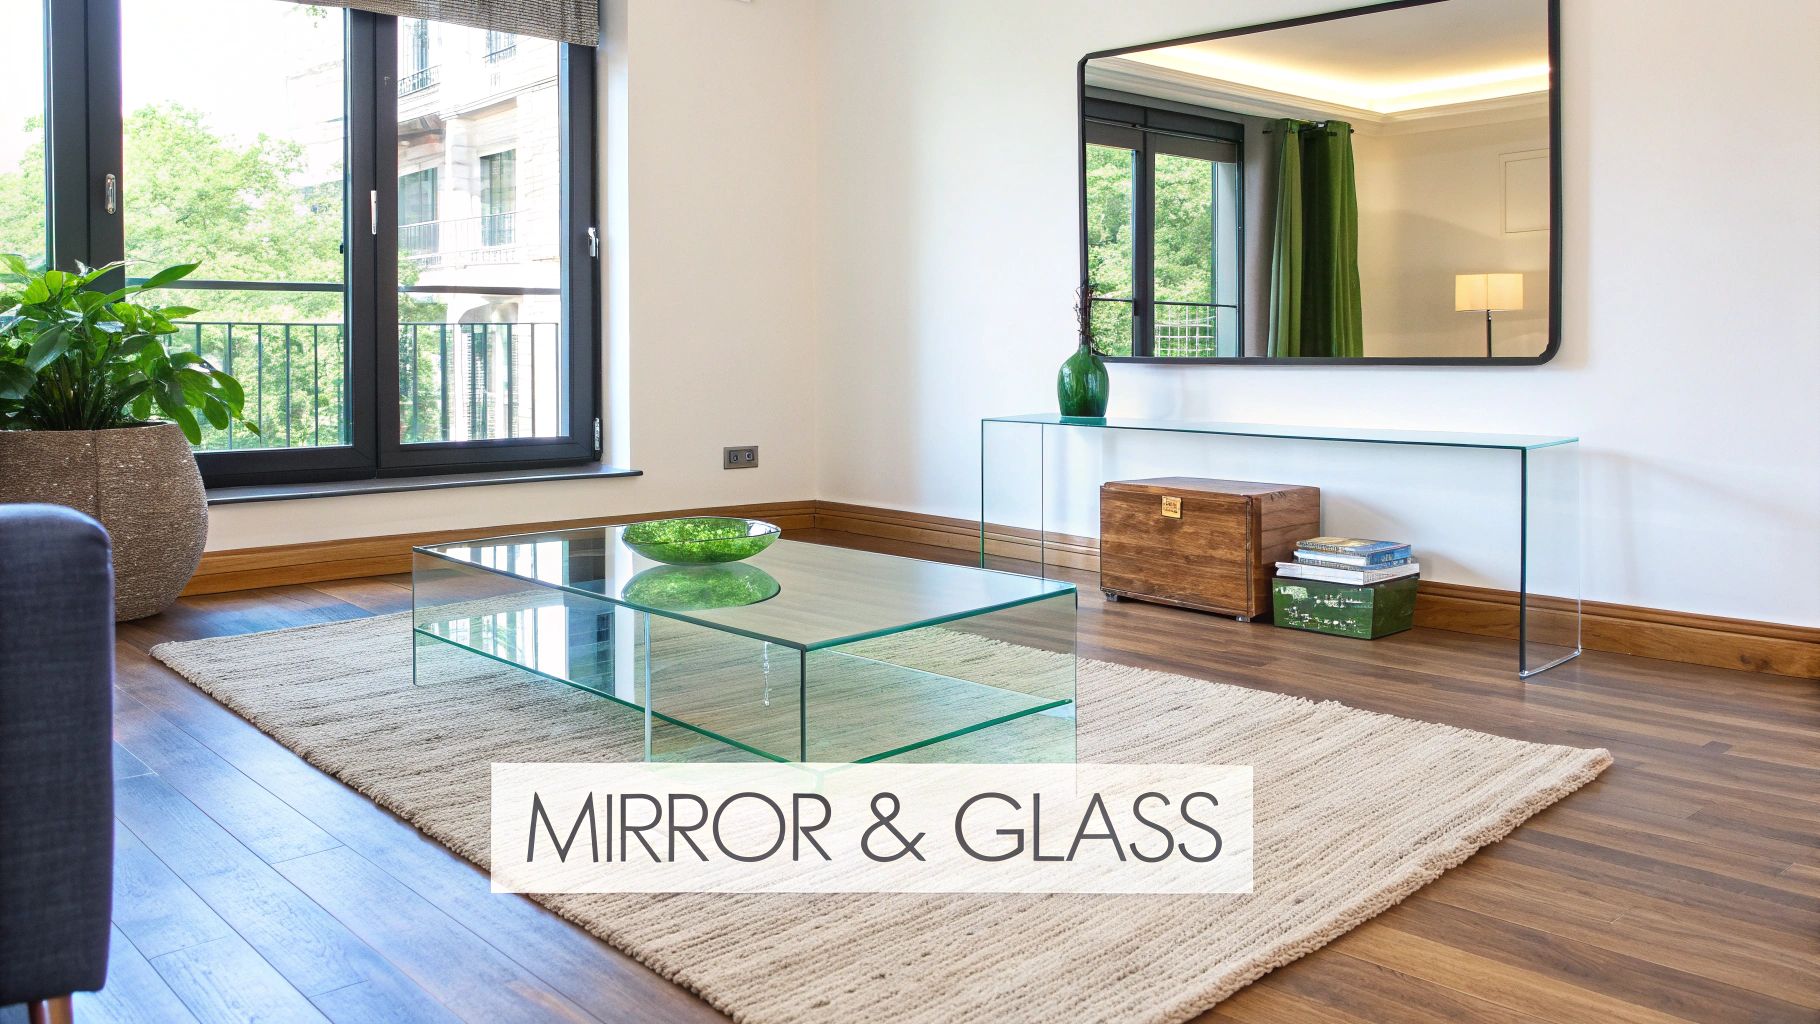
5. Mirror and Glass Layout Strategy
Maximising space in a small living room can be a challenge, but it doesn't necessarily require knocking down walls. One of the most effective small living room layout ideas involves the strategic use of mirrors and glass. This "Mirror and Glass Layout Strategy" leverages reflective and transparent surfaces to create the illusion of expanded space and amplify natural light, making your compact Kiwi living room feel open and airy. It's a clever way to visually double the perceived size of your room without undertaking costly renovations, making it a worthy addition to any list of small living room layout ideas.
This design approach works by tricking the eye. Mirrors reflect light and images, creating a sense of depth and extending the perceived boundaries of the room. Glass and acrylic furniture, on the other hand, allows light to pass through, minimising visual weight and clutter. By carefully positioning these elements, you can dramatically alter the perception of space.
Features of this strategy include:
- Large wall mirrors: Strategically positioned to reflect light sources, captivating views, or other desirable features of the room.
- Glass or acrylic coffee and side tables: These transparent pieces reduce visual bulk and allow light to flow through the space.
- Mirrored or high-gloss cabinet surfaces: Reflective surfaces on storage units contribute to the illusion of spaciousness.
- Transparent furniture elements: Lucite chairs or acrylic shelving units minimise visual clutter and maintain an open feel.
- Reflective accessories and accent pieces: Mirrored trays, metallic finishes, and other reflective décor items add to the overall effect.
Pros:
- Creates the illusion of doubled space without structural changes.
- Amplifies natural and artificial light, brightening the room.
- Reduces visual clutter with transparent furniture.
- Makes the room feel more open and airy.
- Adaptable to various design styles, from traditional to contemporary.
Cons:
- Glass surfaces require frequent cleaning to maintain their pristine appearance and reflective qualities.
- Overuse can create a colder, less cozy atmosphere.
- High-quality mirror and glass pieces can be expensive.
- May create glare issues with direct sunlight, particularly in NZ's bright summer months.
- Not ideal for homes with small children due to safety concerns.
Successful Implementations:
Drawing inspiration from renowned designers can illuminate the power of this strategy. Think of Kelly Wearstler's use of antiqued mirror panels in a Manhattan apartment, or Philippe Starck's iconic ghost chairs in small Parisian apartments. Closer to home, envision West Elm's mirrored furniture collection in urban lofts, or the classic elegance of a Restoration Hardware Marseilles mirror in a compact living space. These examples demonstrate the versatility and impact of mirrors and glass in small rooms.
Tips for Implementation in Your NZ Home:
- Maximise Light: Position mirrors opposite windows to capture and reflect the abundant natural light New Zealand enjoys.
- Cohesive Style: Choose mirror frames that complement your existing décor for a harmonious look.
- Functional Reflection: Incorporate mirrored trays on surfaces for both practical use and added reflective quality.
- Balance and Comfort: Pair glass tables with upholstered seating to create a balance of lightness and warmth.
- Subtle Depth: Opt for antiqued or tinted mirrors for a softer, less intense reflection.
Popularised By:
Designers like Miles Redd, known for his masterful use of mirrors in small spaces, and Philippe Starck, with his innovative transparent furniture, have championed this approach. Kelly Hoppen's reflective interior schemes and Kartell's transparent furniture collections also highlight the effectiveness of this strategy.
By incorporating the Mirror and Glass Layout Strategy, you can transform your small living room into a bright, spacious, and stylish haven, proving that small can indeed be beautiful and functional in any NZ home.
6. Zoned Micro-Layout
Maximising space is a common challenge for Kiwi homeowners, especially in apartments or smaller villas. If you're searching for small living room layout ideas, the zoned micro-layout could be your solution. This clever approach transforms a compact living room into a dynamic, multi-functional space by dividing it into distinct activity zones. Instead of one large room dedicated to a single purpose, the zoned micro-layout allows you to carve out designated areas for conversation, media viewing, reading, a home office, or even a small dining area – all within the same footprint.
This method works by using visual cues rather than physical walls to delineate each zone. Think strategically placed furniture, area rugs, varied lighting schemes, and subtle shifts in colour or texture. For example, a bookcase can act as a divider between a reading nook and a conversation area, while a different rug under the sofa can distinguish the main seating area. This creates the illusion of separate rooms within one open space, making your small living room feel significantly larger and more versatile.
Features of a Zoned Micro-Layout:
- Multiple Functional Areas: Incorporate distinct areas for different activities within a single room.
- Visual Dividers: Use bookcases, console tables, screens, or even strategically placed plants to separate zones.
- Varied Lighting: Implement different lighting schemes for each zone to create the right atmosphere. A reading lamp in the reading nook, ambient lighting in the conversation area, and task lighting for a workspace.
- Cohesive Colour Palette: Maintain a consistent colour palette throughout the room, but incorporate zone-specific accents to add personality and visual interest.
- Shared Elements: Tie all zones together visually with repeated elements like cushions, throws, or artwork in a similar style.
Pros:
- Maximises Functionality: Makes the most of limited square footage by accommodating multiple activities.
- Creates Illusion of Space: Gives the feeling of having multiple rooms in one.
- Simultaneous Activities: Allows different household members to engage in different activities concurrently.
- Visual Interest: Adds depth and dimension to a small room.
- Adaptability: Easily adapts to changing needs and lifestyles.
Cons:
- Planning Required: Requires careful planning to avoid a crowded or cluttered feel.
- Smaller Zones: Individual zones will be smaller than dedicated rooms.
- Potential for Disjointedness: Can feel disjointed if zones aren't visually connected through shared elements.
- Furniture Limitations: May limit furniture size options for each zone.
- Traffic Flow Challenges: Can be challenging to create effective traffic flow between areas.
Examples and Inspiration:
Look to design resources like Dwell magazine for inspiration on how studio apartments effectively utilise zoning. IKEA's small space showrooms and design transformations on shows like Netflix's Queer Eye often feature clever zoning techniques. Even exploring small New York apartment layouts in Architectural Digest can provide valuable ideas for multi-functional living.
Tips for Implementing a Zoned Micro-Layout:
- Area Rugs: Define each zone's boundaries with area rugs.
- Lighting Control: Install separate lighting controls for each area to adjust the ambience.
- Cohesive Colour Scheme: Choose a cohesive colour palette with subtle variations for each zone.
- Natural Features: Position zones strategically to take advantage of natural light from windows.
- Visual Continuity: Create visual continuity with repeated elements across zones, like a specific colour, texture, or material.
Why this approach deserves a place on this list: The zoned micro-layout is a game-changer for small living room layout ideas because it tackles the issue of limited space head-on. It allows you to have a multi-functional living area without compromising on style or comfort. By creating distinct zones, you can enjoy the benefits of a larger home in a smaller footprint, making it an ideal solution for many NZ homes. This concept, popularised by small space experts like Alison Stewart and influenced by designers like Nate Berkus and even the Japanese philosophy of multi-functional spaces, offers a practical and stylish solution for compact living.
7. Built-In and Architectural Solution Layout
For small living room layout ideas in NZ, embracing a built-in and architectural approach can be a game-changer. This method maximises every precious square centimetre by integrating custom-designed elements directly into your living room's architecture. Unlike freestanding furniture that can clutter a small space, built-ins create a seamless, tailored look that enhances both functionality and aesthetic appeal. This design philosophy makes it a worthy addition to our list of small living room layout ideas.
This approach involves incorporating elements like window seats with hidden storage, media walls that house your TV and entertainment systems, recessed shelving that blends seamlessly with the walls, and banquettes designed to fit perfectly within the room’s existing structure. Even niches and alcoves, often overlooked, can be transformed into functional spaces with clever built-in solutions. Furniture pieces, like sofas or bookshelves, can be crafted to the exact dimensions of the room, eliminating awkward gaps and maximising floor space.
Think of a cosy window seat nestled into a bay window, complete with drawers underneath for storing blankets and cushions. Imagine a sleek media wall, custom-built to house your TV and sound system, with cleverly concealed storage for DVDs and games. These are just a few examples of how built-in solutions can transform a small living room. For NZ homeowners, inspiration can be found in the work of international designers like Studio McGee, known for her elegant built-in window seat projects, or Joanna Gaines of Magnolia, who frequently incorporates custom media walls into her designs. Sarah Richardson's small space renovations, often featuring architectural built-ins, also offer a wealth of ideas. Closer to home, look at California Closets’ living room transformation projects for localised storage solutions.
Actionable Tips for Incorporating Built-Ins:
- Power Up: Incorporate electrical outlets within built-ins for easy access to power for lamps, devices, and charging points.
- Bespoke Storage: Design storage solutions for the specific items you own, rather than generic spaces. This will maximise efficiency and minimise clutter.
- Visual Balance: Use a combination of open and closed storage to achieve visual balance and avoid a closed-in feeling. Open shelving can display decorative items, while closed cabinets hide away clutter.
- Flexibility: Consider modular built-in systems that offer some flexibility for future changes or adjustments to the layout.
- Maximise Height: Extend built-ins to the ceiling to maximise storage space and draw the eye upward, making the room feel larger.
Pros and Cons:
Pros:
- Maximises every inch of available space.
- Creates a cohesive and tailored appearance.
- Eliminates awkward gaps between furniture and walls.
- Can incorporate hidden storage in otherwise unused spaces.
- Often makes a room feel larger than with freestanding furniture.
Cons:
- Typically higher initial investment than freestanding furniture.
- Permanence makes it difficult to change the layout later.
- Requires professional design and installation in most cases.
- May complicate future home resale if tastes differ.
- Construction process can be disruptive.
When to Use This Approach:
This approach is ideal for homeowners in NZ who are renovating or building a new home and are looking for small living room layout ideas that prioritise space optimisation and a streamlined aesthetic. It's particularly effective in older homes with awkward layouts or limited square footage. While the initial investment might be higher than freestanding furniture, the long-term benefits in terms of space efficiency and visual appeal can be significant. The influence of architect Sarah Susanka's "Not So Big House" philosophy, the popularity of Restoration Hardware’s built-in furniture collections, and the prevalence of custom millwork on HGTV renovation shows, demonstrate the growing trend towards maximising space through built-in solutions. This approach blends seamlessly with the increasing popularity of Scandinavian design in NZ, which emphasises built-in efficiency and minimalist aesthetics.
8. Symmetrical Balance Layout
For small living rooms in NZ where a sense of order and spaciousness is desired, the symmetrical balance layout offers a classic and effective solution. This layout revolves around creating a mirror image arrangement of furniture and decor on either side of a central focal point. This approach is a fantastic small living room layout idea because it maximises the feeling of calm and order, which can make a compact space feel significantly larger.
Think of it like this: imagine a fireplace, a large window, or a striking piece of art as the central point. Now, picture matching sofas or armchairs flanking either side, accompanied by identical side tables and lamps. This mirrored arrangement establishes a strong sense of balance and intentionality. The inherent order of symmetry creates a calming effect and avoids the visual clutter that can easily overwhelm a small space. The deliberate proportions also contribute to a feeling of expansiveness.
This layout is ideally suited for homeowners who appreciate a formal, elegant aesthetic and find comfort in organised spaces. The clear central axis provides a sense of structure, which can be particularly beneficial in smaller Kiwi homes where maximising space is key.
Features of a Symmetrical Balance Layout:
- Matching pairs: Key furniture pieces like chairs, side tables, and lamps are mirrored.
- Focal point: A fireplace, window, or art piece serves as the central anchor.
- Balanced visual weight: Both sides of the room hold equal visual presence.
- Formal arrangement: Furniture is placed symmetrically along a clear central axis.
- Repeated elements: Creates rhythm and order.
Pros:
- Creates a sense of order, making small spaces feel less chaotic.
- Easier to plan and execute than asymmetrical layouts.
- Establishes a formal, intentional, and elegant appearance.
- Enhances balance and harmony within the room.
- Can make a small room feel larger due to its orderly arrangement.
Cons:
- Can appear rigid or lacking in personality if overdone.
- May require purchasing pairs of items, potentially increasing costs.
- Less adaptable to irregular room shapes or unique architectural features often found in older NZ homes.
- Might feel overly formal for those preferring a casual, relaxed style.
- Can be challenging to maintain in homes with children or pets.
Examples:
- Think of the classic symmetrical living rooms often featured in House & Garden magazine, particularly those showcasing traditional British townhouses.
- Draw inspiration from designer Bunny Williams’ elegant and balanced spaces.
- Visualise the formal symmetry often showcased in Restoration Hardware showrooms, scaled down for a residential setting.
- Consider the Oval Office's iconic symmetrical layout, adapted for a smaller scale.
Tips for Implementation:
- Choose a dominant focal point: This will anchor the entire arrangement. A fireplace, a large window with a view of your NZ garden, or even a captivating piece of Māori art could be excellent choices.
- Identical main pieces, varied accessories: Use matching pairs for larger furniture items but introduce subtle variations through accessories to avoid rigidity. Consider incorporating texture with cushions and throws made from NZ wool or flax.
- Maintain visual balance: If finding perfect pairs is difficult, aim for equal visual weight on both sides instead of exact duplication.
- Incorporate mirrors: A large mirror can reinforce symmetry and enhance the perception of space, a valuable trick in small living rooms.
- Explore variations in fabric: Choose furniture with matching silhouettes but different fabrics or colours for a more dynamic and interesting look. Incorporate colours inspired by the NZ landscape, like earthy browns, deep greens, and ocean blues.
Popularised By:
- Interior designer Mark D. Sikes
- Traditional English and French interior design principles
- Designer Charlotte Moss's classic symmetrical arrangements
- Architectural Digest features on formal living spaces
By following these guidelines, you can leverage the power of symmetry to create a small living room that feels both stylish and spacious, perfectly suited for the unique character of NZ homes.
8 Small Living Room Layouts Compared
| Layout Idea | Implementation Complexity 🔄 | Resource Requirements ⚡ | Expected Outcomes 📊 | Ideal Use Cases 💡 | Key Advantages ⭐ |
|---|---|---|---|---|---|
| Multi-Functional Furniture Layout | Moderate to High (quality mechanisms) | Moderate (initial cost of convertible furniture) | Maximises usable space and adaptability | Small spaces needing versatile use | Space-saving, cost-effective vs multiple pieces |
| Floating Furniture Arrangement | Moderate (requires careful scaling) | Low to Moderate (standard furniture) | Creates spacious feeling and intimate zones | Small to medium rooms aiming for flow/focal points | Enhances conversation, improves flow |
| Vertical Space Optimisation | Moderate to High (wall installations) | Moderate (custom shelving, lighting) | Maximises storage, makes rooms feel taller | Rooms with standard ceiling height, limited floor | Frees floor space, adds height illusion |
| Diagonal Furniture Placement | Moderate (planning for flow & angles) | Low to Moderate (standard furniture) | Breaks boxy layout, adds visual interest | Rooms with complex layouts, multiple doorways | Improves flow, creates unique visual dynamics |
| Mirror and Glass Layout Strategy | Low to Moderate (placement & selection) | Moderate to High (quality mirrors/glass) | Expands perceived space, amplifies light | Any style small rooms needing bright, airy feel | Illusion of space, light enhancement |
| Zoned Micro-Layout | High (careful planning required) | Moderate (varied furniture & lighting) | Multi-functional, feels like multiple rooms | Small spaces needing separate activity zones | Maximises functionality, adaptable |
| Built-In and Architectural Solution Layout | High (custom design & installation) | High (professional costs and materials) | Maximises every inch, tailored, cohesive look | Permanent small spaces emphasising custom work | Seamless fit, adds home value, hidden storage |
| Symmetrical Balance Layout | Moderate (matching pieces & layout) | Moderate to High (pairs of furniture) | Creates formal, harmonious appearance | Formal, classical designs; rooms with focal points | Orderly, calming, makes small rooms appear larger |
Creating Your Perfect Small Living Room Oasis
Maximising space in a small living room can feel like a puzzle, but by implementing these eight small living room layout ideas—from multi-functional furniture and floating arrangements to vertical space optimisation and diagonal furniture placement—you can transform your compact space into a stylish and functional haven. Remember, the most effective small living room layout ideas are those tailored to your specific needs and aesthetic preferences. Whether you’re drawn to the clean lines of a symmetrical balance layout or the adaptability of a zoned micro-layout, the goal is to create a space that feels both open and inviting. For environmentally conscious homeowners, exploring eco-friendly options for organising and storing items can further enhance the sense of harmony within a small living room. Consider browsing sustainable packaging solutions for inspiration and practical ideas from MrTakeOutBags.com. By mastering these small living room layout ideas, you're not just optimising space; you're creating a comfortable and personalised sanctuary that reflects your style and enhances your everyday life.
Ready to furnish your newly designed small living room with stylish and space-saving pieces? Discover a wide range of furniture and multi-purpose essentials from leading brands like Beko appliances and furniture by design at Folders, your one-stop shop for maximising small living room potential in NZ.