

Classic Pavlova Recipe NZ: Perfect Kiwi Meringue Guide
Let's be clear: the pavlova belongs to New Zealand. This isn't just national pride; historical evidence backs up this claim. This iconic dessert, a crisp meringue shell paired with a marshmallowy interior, is a staple at Kiwi celebrations and family gatherings. But how did this delicate dessert become a national symbol?
Tracing the Pavlova's Kiwi Roots
The story begins in the 1920s and 1930s, a time of culinary experimentation in New Zealand. Home bakers explored meringue techniques, aiming to create a unique dish. These early efforts formed the foundation for the classic pavlova recipe New Zealanders enjoy today.
This era witnessed a surge in published pavlova recipes, cementing its place in Kiwi culinary history. The classic pavlova recipe in New Zealand has a well-documented history, going back to the late 1920s. Food anthropologist Helen Leach of the University of Otago uncovered at least 21 pavlova recipes published in New Zealand cookbooks by 1940, years ahead of any Australian publications. Learn more: Pavlova History
The Cultural Significance of Pavlova
For generations, the pavlova has represented more than just dessert in New Zealand. It symbolises family, celebration, and national identity. This strong cultural connection underscores the importance of getting the classic recipe just right. For more on food trends, see: Latest News Perfecting a pavlova isn't just about achieving the perfect meringue; it's about preserving a piece of Kiwi heritage.
Why the Classic Recipe Matters
The specific ingredients and methods of the classic New Zealand pavlova produce a distinct texture and flavour. Every detail, from the precise balance of egg whites and sugar to the inclusion of cornflour and vinegar, is crucial. This dedication to tradition ensures the pavlova continues to hold a special place in Kiwi culture. Further reading: July's Bedtime Reading. Understanding the history adds depth to the experience of making and savoring this iconic dessert.
Mastering The Traditional Kiwi Technique And Ingredients
The secret to a truly classic New Zealand pavlova isn't just about the ingredients themselves, but understanding the why behind them. Kiwi home bakers have perfected this delicate balance of textures over generations, resulting in a dessert that's both iconic and incredibly delicious. Let's dive into the time-tested formula that makes a New Zealand pavlova truly special.
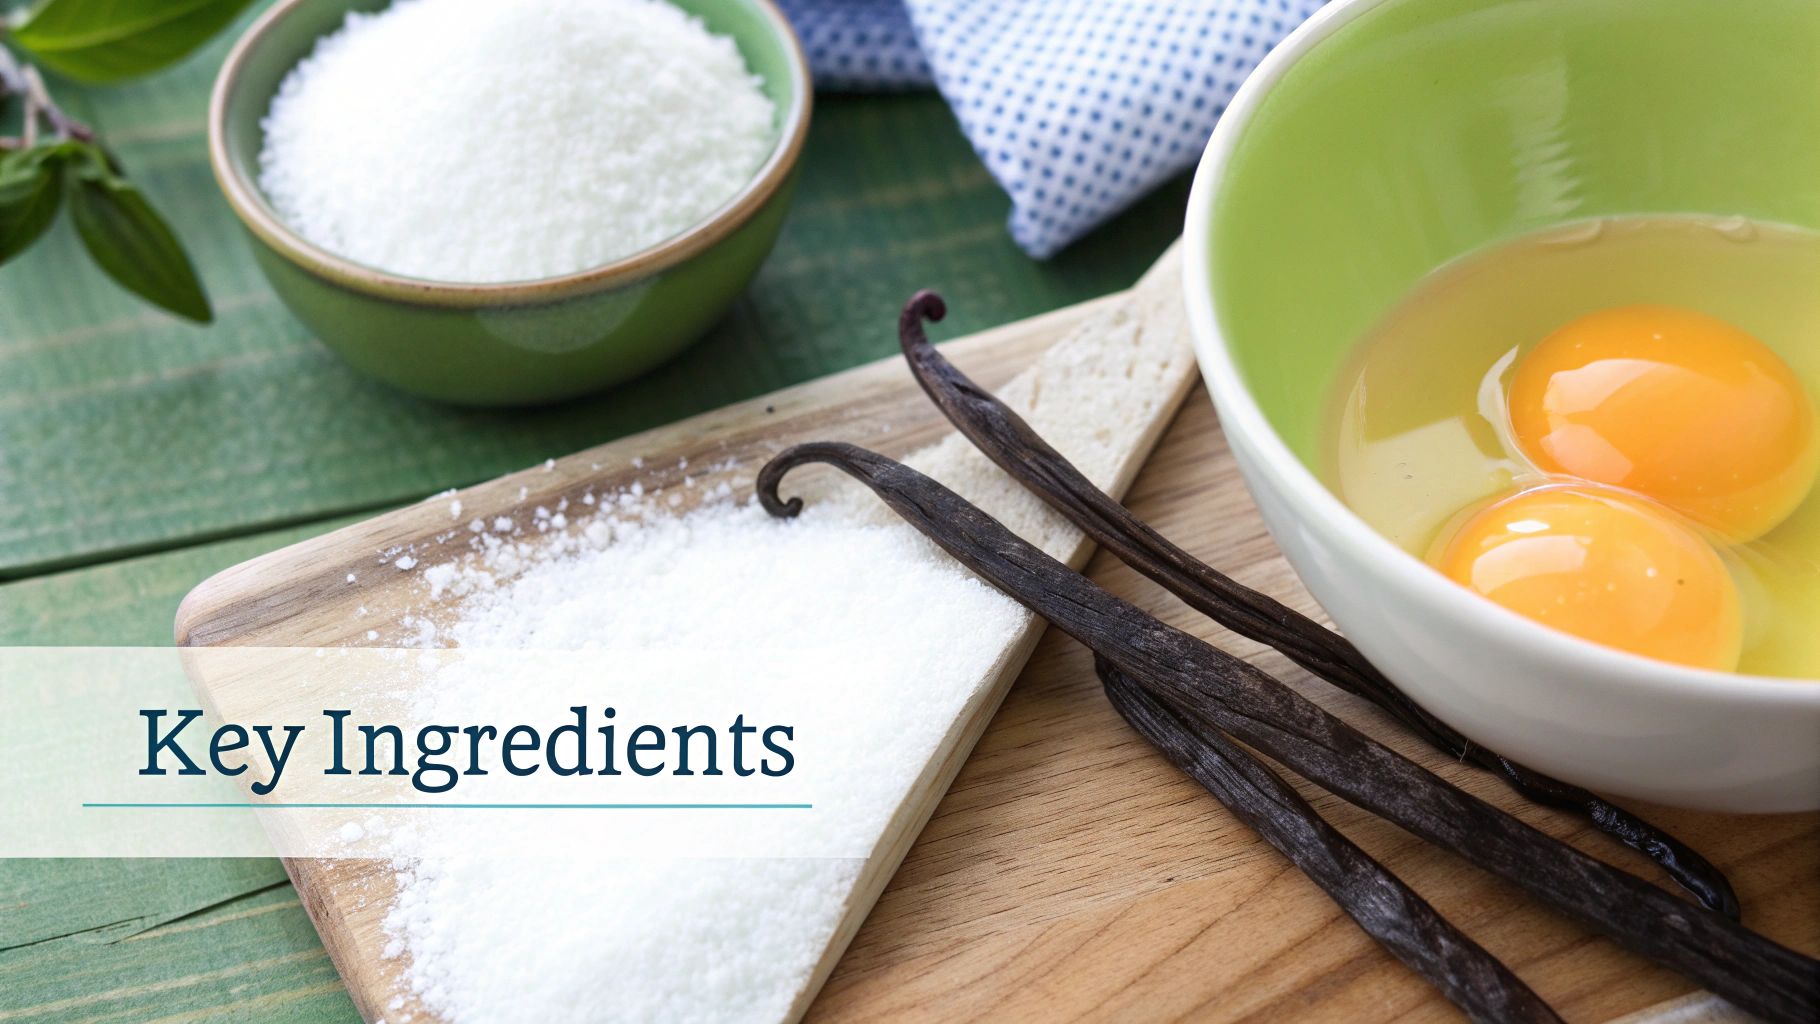
The Crucial Ratio: Egg Whites and Sugar
The meringue forms the foundation of any good pavlova. The relationship between the egg whites and sugar is paramount. This ratio determines the final texture—that signature crisp exterior and marshmallow-soft interior. Think of egg whites as tiny air bubbles waiting to expand. The sugar acts as a stabiliser, reinforcing these bubbles as they're whisked. This creates a structure that can withstand the oven's heat, resulting in the pavlova's distinctive crisp shell.
The Magic of Cornflour and Vinegar
Cornflour and vinegar aren't just random additions; they play vital roles. Cornflour contributes to the chewy, marshmallowy centre, contrasting beautifully with the crisp shell. Vinegar helps stabilise the meringue, preventing it from weeping or collapsing. During baking, the vinegar reacts with the sugar to create a more stable structure. By 1934, a recipe featuring four egg whites, a breakfast cup of sugar, and a teaspoon of vinegar, baked in a cake tin, appeared in the New Zealand Women's Weekly. This early version closely resembles the classic pavlova we enjoy today. Learn more about pavlova history.
Temperature Control, Mixing, and Timing
Mastering the technique is just as important as the ingredients. Temperature plays a crucial role in meringue success. Room temperature egg whites whip up to a greater volume than cold ones, incorporating more air for a lighter, airier meringue.
Mixing technique is also critical. Gradually adding the sugar ensures it dissolves completely, creating a glossy, smooth meringue. Over-mixing, however, can lead to a grainy texture. You might be interested in freezing techniques.
Finally, timing is everything. Baking at the correct temperature for the right duration creates that perfect contrast of textures. Over-baking results in a dry, brittle pavlova, while under-baking leaves it gooey in the center. For more reading, you might find this blog interesting. These seemingly small details are the key to pavlova perfection.
Step-By-Step Classic Pavlova Recipe NZ Method
Ready to create pavlova magic? This guide walks you through each step of the traditional New Zealand method, offering tips to guarantee success, even for first-timers. We'll explore techniques for that perfect meringue consistency, from recognising peak stages to gradually adding sugar. You’ll also master the folding method for cornflour and vinegar—essential for volume and stability.
We’ll cover the optimal oven temperature and baking time for that crisp shell and pillowy centre, plus how to tell when your pavlova is perfectly baked. Each step includes troubleshooting advice to help you avoid common issues like weeping, cracking, or collapse, ensuring bakery-quality results every time.

This infographic visualises the three key steps to a stable meringue: whisking egg whites to stiff peaks, gradually incorporating sugar until glossy, and gently folding in cornflour and vinegar. These steps create a meringue that holds its shape and achieves the perfect texture. The infographic demonstrates how each stage builds upon the previous, creating a light yet stable mixture ready for baking.
Preparing the Meringue
-
Preheat your oven: Set your oven to 120°C (250°F). This low temperature is key for slowly drying the meringue and creating that signature crisp shell.
-
Prepare your baking sheet: Line a baking sheet with baking paper. Draw a 20cm (8-inch) circle on the paper to guide your pavlova’s shape.
-
Egg whites: Separate 4 large eggs, ensuring no yolk contaminates the whites. Room temperature eggs whip up to maximum volume.
-
Beat the egg whites: In a clean, dry bowl, beat the egg whites with an electric mixer KitchenAid until stiff peaks form. The meringue should be glossy and hold its shape when you lift the beaters.
Adding the Sugar and Stabilisers
-
Gradual sugar incorporation: Gradually add 1 cup of caster sugar, one tablespoon at a time, while whisking continuously. This slow addition dissolves the sugar completely, creating a smooth and stable meringue.
-
Folding in cornflour and vinegar: Combine 1 tablespoon of cornflour and 1 teaspoon of white vinegar in a separate bowl. Gently fold this mixture into the meringue using a spatula. This adds stability and contributes to the marshmallowy interior.
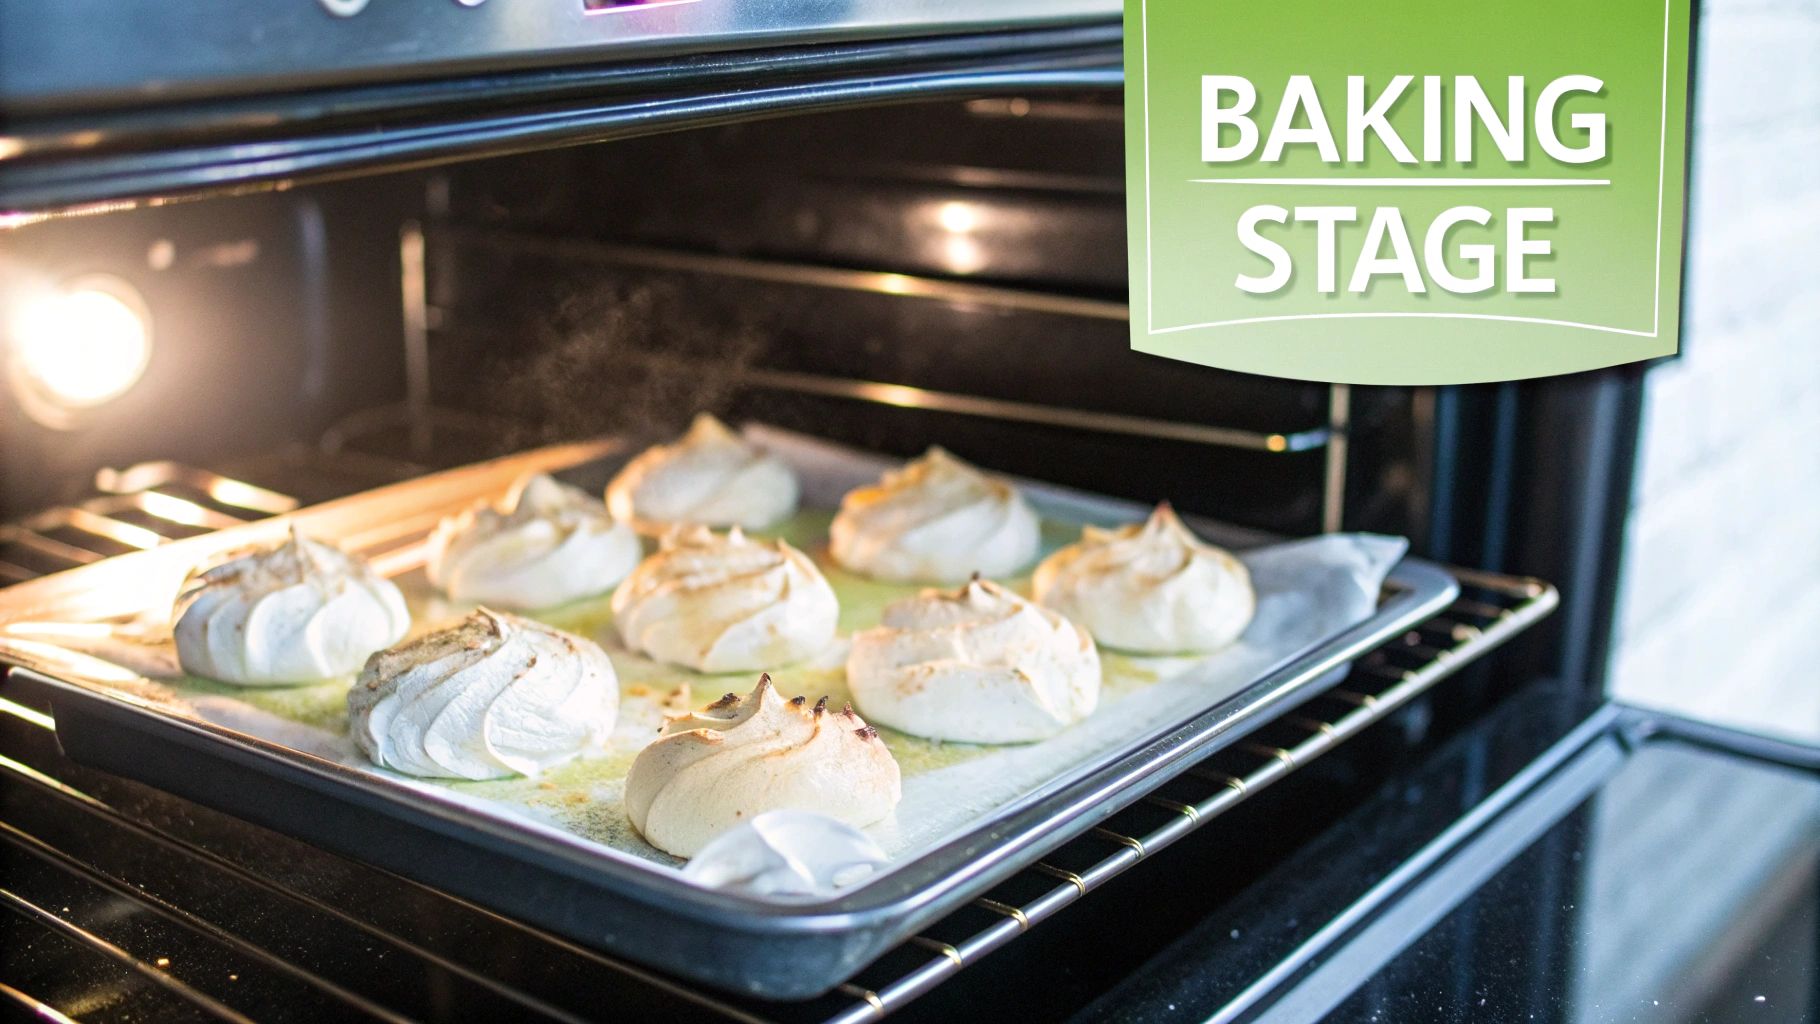
Baking and Cooling
-
Baking the pavlova: Carefully spoon the meringue onto the prepared baking sheet within the drawn circle. Bake for 1 hour and 15 minutes. Then, turn off the oven and leave the pavlova inside to cool completely with the door slightly ajar. This slow cooling prevents cracking.
-
Checking for doneness: A perfect pavlova boasts a crisp outer shell and a soft, marshmallowy interior. It should sound hollow when tapped on the bottom. Check out our guide on perfecting banana bread.
This guide covers all the essentials of a classic New Zealand pavlova recipe, setting you up for success. By carefully executing each step, you’ll create a stunning pavlova that tastes as good as it looks.
Professional Tips For Consistent Pavlova Success
Transform yourself into a pavlova pro with these insider tips. Kiwis know that a truly spectacular pavlova isn't just about following a recipe. It's about understanding the subtleties that turn a good pavlova into a showstopper. This guide will give you the knowledge you need to achieve consistent pavlova success.
The Right Environment Matters
The weather can actually impact your pavlova. Humidity is a meringue’s biggest enemy. A humid day can make your meringue sticky and weepy.
For the best results, bake on a dry day. This allows the meringue to dry completely, creating a crisp shell. If a humid day is unavoidable, slightly increase the baking time to help the meringue dry.
Recognising the Glossy Stage
Knowing when your meringue is ready is critical. The meringue should be thick and glossy, holding stiff peaks that don't droop. Imagine whipped cream – when the beaters are lifted, the peaks should stand tall and firm.
This tells you enough air has been incorporated and the sugar is fully dissolved, both crucial for pavlova success. The glossy texture is a key sign of a stable meringue that will hold its shape in the oven.
Preventing Pavlova Disasters
Even with careful preparation, problems can arise. Cracking, weeping, and collapse are common issues, easily prevented with a few precautions.
Use a spotlessly clean, grease-free bowl when beating egg whites. Even a tiny bit of fat can prevent them from whipping properly. Avoid opening the oven door during baking, as temperature fluctuations can cause cracks.
Troubleshooting and Recovery
Don’t panic if your pavlova cracks or weeps! These situations are often salvageable. Hide cracks with artfully placed whipped cream and fruit. If your meringue weeps, try increasing the oven temperature slightly for the last few minutes of baking to dry it out. Simple solutions like these can save your dessert.
Here's a handy table to help you troubleshoot common pavlova issues:
A comprehensive troubleshooting guide showing pavlova issues, their causes, and prevention methods:
| Problem | Cause | Prevention | Solution |
|---|---|---|---|
| Cracked Meringue | Opening the oven door during baking; Cooling too quickly | Avoid opening the oven during baking; Cool gradually in the oven with the door slightly ajar | Cover with whipped cream and fruit |
| Weeping Meringue | High humidity; Under-baking | Bake on a dry day; Increase baking time slightly | Increase oven temperature in the last few minutes of baking |
| Sticky Meringue | High humidity; Undissolved sugar | Bake on a dry day; Ensure sugar is fully dissolved during whipping | Extend baking time slightly |
| Collapsed Meringue | Under-beating egg whites; Fat in the mixing bowl | Beat egg whites until stiff and glossy; Use a clean, grease-free bowl | Not usually salvageable; try making a trifle |
This table provides a quick reference for diagnosing and fixing common pavlova problems, helping you achieve that perfect meringue every time.
Storage and Transport
Proper storage is essential for a crisp pavlova. Store the meringue base in an airtight container at room temperature for up to two days. Add toppings just before serving to prevent the meringue from getting soggy.
A flat, sturdy container is essential for transport. Carry the pavlova carefully, avoiding sudden movements.
Tips for Make-Ahead Pavlovas
Baking the meringue ahead of time can be a game-changer for entertaining. Bake the meringue a day or two in advance and store it in an airtight container. Prepare toppings separately and assemble just before serving. This saves time and stress.
These tips will help you master the classic pavlova and impress your friends and family. With a little practice, you'll become the designated pavlova maker in your whānau!
Authentic Kiwi Toppings And Seasonal Celebrations
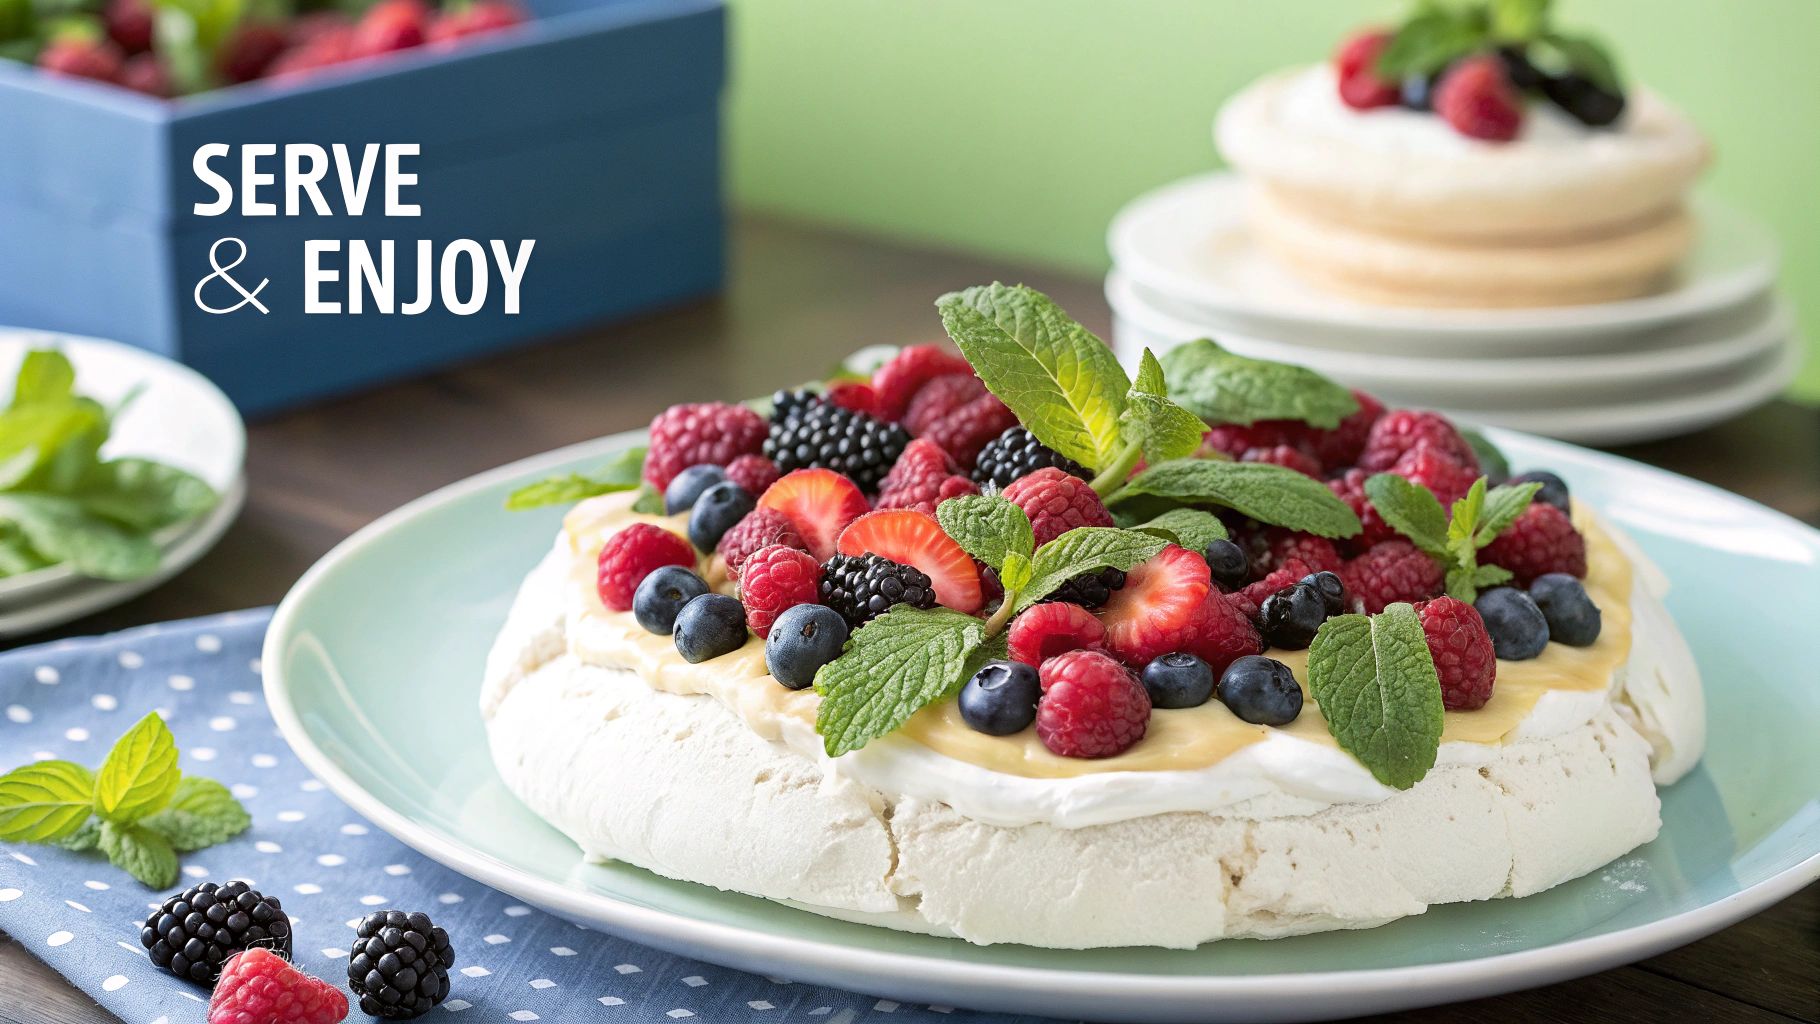
A classic New Zealand pavlova isn't truly complete without the right toppings. The magic of a pavlova lies in its adaptability, letting you showcase New Zealand's amazing seasonal produce. Building on that crisp meringue base, traditional Kiwi toppings create a wonderful balance of flavors and textures.
The Time-Honoured Duo: Whipped Cream and Fruit
Freshly whipped cream is the essential pavlova topping. Its light texture complements the crisp meringue, and its richness offsets the sweetness. Kiwis have perfected this combination over generations, understanding the importance of toppings that enhance, not overwhelm, the delicate meringue. A simple dollop of whipped cream is delicious on its own, but try adding a splash of vanilla extract or a dusting of icing sugar for an extra touch of flavor.
The real star, however, is the fruit. Seasonal fruits are vital for a truly authentic Kiwi pavlova experience, celebrating New Zealand's fresh produce year-round.
A Seasonal Celebration
Summer brings an abundance of berries – strawberries, raspberries, blueberries – creating a vibrant and refreshing topping. Stone fruits like peaches, nectarines, and plums offer a sweet juiciness that pairs beautifully with the creamy meringue.
As the weather turns cooler, winter citrus fruits like oranges, mandarins, and kiwifruit bring a burst of tangy flavor. Tropical fruits such as passionfruit and mangoes offer a more exotic twist. To keep your fresh produce in peak condition, check out our helpful article: How to master your fridge organization.
Presentation: From Homemade to Showstopper
With a few simple techniques, your pavlova can become a true centerpiece. Start by evenly spreading the whipped cream over the meringue to create a smooth base for the fruit. Arrange the fruit attractively, perhaps creating a pattern or using contrasting colors for visual impact. A light dusting of icing sugar adds a touch of elegance.
Don't hesitate to experiment! Toasted nuts, a drizzle of chocolate sauce, or a sprinkle of edible flowers can add a unique and personal touch to your pavlova.
By using the best of New Zealand's seasonal ingredients and thoughtful presentation, your pavlova will not only be a delicious treat but also a beautiful expression of Kiwi culinary tradition.
Expert Serving And Storage For Perfect Results
Serving and storing a pavlova correctly can transform it from a simple dessert into a truly memorable experience. From the initial slice to that very last bite, proper handling ensures your classic New Zealand pavlova recipe remains a showstopper. We'll explore the importance of timing, effective cutting techniques, and the best storage practices to achieve pavlova perfection.
Timing Is Key: Assembling Your Pavlova
A pavlova's signature element is the crispness of its meringue shell. Maintaining that delightful contrast in textures depends heavily on timing. Assembling your pavlova too early can result in a soggy bottom, a common pavlova problem.
The best approach is to assemble your pavlova right before serving. This preserves the meringue's crispness and prevents the whipped cream and fruit from seeping into the delicate structure. If you absolutely must prepare in advance, store the meringue base and toppings separately. For more helpful kitchen tips and insights, check out our article on exploring popular dishwasher brands in New Zealand. This ensures your pavlova retains its delightful textural combination when served.
Cutting and Portioning Like a Pro
Cutting a pavlova can be a delicate operation. Its fragile structure demands a gentle touch and the correct method to prevent crumbling. A sharp, serrated knife is essential for achieving clean, picture-perfect slices. Gently saw through the meringue, avoiding downward pressure which can crush the airy interior.
Portion sizes can be adapted to suit any occasion. Larger slices work well for a casual family dessert, while smaller, more elegant portions are better suited to a formal setting.
Storing Leftover Pavlova (If There Are Any!)
Proper storage is key to preserving leftover pavlova. Ideally, the meringue base should be stored separately from the toppings. Store the meringue in an airtight container at room temperature for up to two days. Whipped cream and fresh fruit, however, require refrigeration.
To help you keep each component fresh, we've created a handy storage guide. The table below outlines the best methods and time limits for storing your leftover pavlova:
To help you keep each component fresh, we've put together a handy guide. The "Pavlova Component Storage Guide" below summarizes the recommended storage times and methods for each part of your pavlova.
| Component | Storage Method | Time Limit | Quality Tips |
|---|---|---|---|
| Meringue Base | Airtight container at room temperature | Up to 2 days | Keep away from moisture |
| Whipped Cream | Airtight container in the refrigerator | Up to 2 days | Whip just before serving for best texture |
| Fresh Fruit | Airtight container in the refrigerator | Varies depending on fruit | Store separately to prevent moisture transfer |
By following these guidelines, you can ensure that even leftover pavlova retains its delicious flavor and texture. Whether it's a casual family gathering or a spectacular centerpiece for a party, these tips will help your pavlova be remembered fondly.
Building Your Family's Pavlova Legacy
The classic pavlova recipe isn't just about making a delicious dessert; it's about creating a cherished family tradition. This iconic dessert has graced New Zealand tables for generations, symbolising family, celebration, and a shared love for something truly special. Let's explore how the pavlova can become more than just a dessert – a treasured part of your family's culinary story.
Pavlova: A Cornerstone of Kiwi Culture
Pavlova holds a special place in New Zealand's cultural identity. It's the quintessential Kiwi dessert, a symbol of warm hospitality, and the sweet finale to countless family gatherings. Sharing a pavlova connects you to generations of Kiwis who have enjoyed this delightful tradition. Making a pavlova isn't just about baking; it's about participating in a shared cultural experience that strengthens family bonds and creates lasting memories.
Creating Family Memories Through Pavlova
Elevate your pavlova from a simple treat to a cherished family ritual. Make it your signature contribution to holidays, birthdays, and other special occasions. Becoming the designated pavlova maker in your family isn't just about dessert; it's about establishing a heartwarming tradition. Imagine your family eagerly anticipating your perfectly crafted pavlova at every gathering.
Getting Everyone Involved
Baking a pavlova can be a wonderful family activity. Involve younger family members by teaching them simple tasks like separating eggs or whisking the meringue. Older children can take on more challenging steps, such as gradually adding the sugar or carefully folding in the cornflour and vinegar. This shared experience makes the final product even more special.
Personalised Pavlova Toppings
Customising toppings can become another treasured aspect of the tradition. Let everyone create their own mini-masterpiece by choosing their favorite seasonal fruits and decorations. This adds a personal touch and makes the pavlova experience even more enjoyable for everyone involved. Picture a table filled with mini pavlovas, each a unique reflection of your family members’ tastes and creativity.
The classic pavlova recipe offers more than just a dessert; it's a symbol of family, creativity, and the joy of sharing something delicious with loved ones. By embracing this tradition, you’re not just baking a pavlova; you’re creating a legacy.
Looking to upgrade your kitchen? Check out Folders, your one-stop shop for all your kitchen appliance needs.